You'll get the first blue potion from the math puzzle room.
Just stand on top of the grey number 4 and interact.
Stand on top of the + symbol while you're at it as well to get a wooden(?) ladder.
Btw has anyone managed to get ending A?
Edit: At the very end I'm stuck at ending B and I have 7 water potions, a blue potion and a yellow potion as leftovers...
So I figured why not try to make something out of it if I can and by mixing 4 water potions I got a magical water potion... maybe that'll do something since you can't drink this potion
Edit2: I used the magical potion to extinguish the fireplace... maybe that'll change ending B, however i'm gonna make another magical potion to be safe since it's possible to get and infinite amount of water from the room where you get the ingredients for the second potion.
Edit3: Still getting ending B and missing cg 3 and 4 as well T-T
Found the full version of the game, and completed it. You need to have eaten the mushroom for ending A - if you haven't found the mushroom yet, a hint is you'll need the crowbar to get it.
Most of the CG variants are different costumes - for every event you can, try doing it in the normal dress and the swimming costume (and in one case, whilst in a smaller body).
Are the the mushrooms in i.imgur.c om/KhdvKp7.png the mushrooms I need to eat?
If yes then how the hell do I stop the shrooms from turning into the "move certain objects spell" crystal? @_@ #Frustration
Edit2: I got cg 3 and 4 now, but I still haven't found any other mushroom other than the one I've seen in the picture I linked. Another hint or instructions to get to ending A would be really appeciated
A hint that might help me alot would be the answer of the following question: Which room do I need to search in order to find that mushroom :x?
After you attack the octopus for the first time your clothes will get soaked.
Go back to her room and interact with her wardrobe.
Interact with the wardrobe again and you'll have 2 options to choose from...
One will be the regular outfit and the other will be a swimsuit.
Use the swimsuit to walk on shallow water.
I'm stuck in this part too. I got the swimsuit but can't enter the water from anywhere. I beat the math puzzle and got to the switch which drains the water away, but then I can't go down.
I'm stuck in this part too. I got the swimsuit but can't enter the water from anywhere. I beat the math puzzle and got to the switch which drains the water away, but then I can't go down.
I'm stuck in this part too. I got the swimsuit but can't enter the water from anywhere. I beat the math puzzle and got to the switch which drains the water away, but then I can't go down.
You'll get the first blue potion from the math puzzle room.
Just stand on top of the grey number 4 and interact.
Stand on top of the + symbol while you're at it as well to get a wooden(?) ladder.
Seeing as there were some interest in this game and it isn't one of the friendliest games for people with limited japanese reading abilities like me I'll provide a walkthrough. There will be two main spoiler boxes, one gives base directions, almost a flowchart, so it won't solve any puzzle answers and the other is the complete one with the A ending (which was a pain to find) but also how to access the other ones.
PS. I'll be assuming you check all the obvious objects like swords, books and jars for the sake of not making this too big.
PS 2. For the first scene, watch the tutorial (second option at game start).
PS 3. There are three scenes that you can get by drinking a lot of water. Its one for normal clothes, one for swimsuit and one when you get younger. I'm not 100% sure but I think you can't drink anymore water when you trigger one of them so don't save after triggering it (seeing it and not saving will still add it to your gallery)
PS4. Almost all scenes give a game over.
Game Flowchart:
Jar -> Open chest -> Water room -> Lower tile path (Key) -> Clothes -> Math Puzzle -> Water path (swimsuit) -> Water path room -> Lever -> Lower tile path -> First room (ignore left wooden box for ending A) -> Cells -> Laboratory -> Potion -> Small passage -> "small" bedroom -> laboratory -> green tile room -> top "small" room -> Laboratory -> Fireplace -> Goblin cell -> Laboratory -> First room -> Summon -> Left wooden box -> Water room -> First room -> Find hidden stairs -> Ending
For ending A go through the hidden stairs and use the mushroom when prompted to and keep going, for ending B don't use it.
For ending D choose second then first option at the middle summon ring in the first room (after getting the mushroom, don't need to go to secret path, just get it.
And for ending C go through the secret path without making the big circle (water room and green tile room).
For endings A, B and C then: -> Hidden path -> 5 man circle -> Last room
Walkthrough:
First off, interact with everything once (CG mode item is hidden on the bed). Then, as you got an empty bottle, transfer the water from the upper jar to the lower one using the second option on the upper one and the second on the lower one (except for the first time).
Check the upper jar when empty to get a cube. Use the balance to find its weight (apparently its random, you can get it from trial and error). Then, as you might have noticed a box had circle + square + triangle written. Circle is the number at the paper close to the door = 9. Square is the cube weight. Triangle is the number of triangles on all magic circles on the room, which includes one on a paper you get and on the one close to the door which totals 5 and they've got 8 triangles equaling 40. So its cube weight + 49.
Now proceed to the next room, go through the bottom path, get the key and the octopus will attack you, *bottom option gives a scene*, use the top option to use the sword to get it away, go back to your room, use the drawer on the right to change clothes. Use the drawer again and it will tell you about the swimsuit. Use it again and choose the bottom option to wear it.
Go through the top path and there is the math puzzle. You need to complete each line. The key to it is to start from the right line * in all explanations X = a non defined number aka. empty space or a number that doesn't really matter * (only one way for something + X2 to result a number that ends on 0) or the middle empty space on the bottom one (only two numbers there can result in a 2 if multiplied by a number that's X2, and one of the two options would require that both of the other empty spaces be the same which isn't possible) as their logic does not depend on the other lines.
After that clear the top and mid (vertical) lines. Now it gets a bit more complex. Look at the middle horizontal line and the left one. So, for the empty space those lines share we need a number that satisfies two criterias: 1- won't make a 2X number overblow two digits. 2- Fits with the remaining possibilities of 2 times X8. Only one of the remaining numbers fit both of those requirements. Complete the middle (horizontal line). Now go back to the bottom line and there will be only a single number that doesn't overblow two digits on the empty space left at the multiplication (X2). Just follow what you have of the math operations to place the remaining numbers.
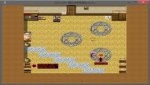
Interact with the door and it will open. Get the item and use the lever. On the math room interact with the center tile and the + on the right to get the rope and the medicine.
Here is a photo with the math room clear method and the hidden tiles:
Actually I can't post links and the attachment size limit is too low, so click on my profile and check the album tab to the right
Now go down and into the room to the upper right. Go through the water to get an item (need swimsuit) and then to the door on the right. You will find a bar there the opens some wooden boxes. Open the one right outside, place the stairs on the math room exit, but before you go down, push the small platform directly under the second pillar on the bottom path to be able to go to the bottom exit later. Now go back to the math room and pull the lever. Then go down the new path and the octopus will show up again. *first option gives a scene, it has two variations depending on clothes used*
, use the second option and then get the octopus part.
If you're still with the swimsuit it will take you back to the first room to change.
There is one very important thing here. Do NOT open the left box (the one with the code next to the chest). The reason for this is that it has a mushroom that you need to get ending A but if you get it early it will be used for a summon. You will soon get another item to replace it in the summon.
Get the shield, fill your bottle with water on the lower jar and go through the new path. Get the item on the floor, open the cell, get the bottle and past the goblins. *Get hit a lot of times by the goblins for a scene*
Now you're on the laboratory of non-japanese doom . First, open the small door. * interact with the small door again after opening it and choose the second option for a scene*. Interact with the whole room and now its potion time. To make it, go to the almost empty table on the bottom part of the lab and after facing the table and prompting a message (ex: 1番目の素材は・・・) go to the item menu and choose the correct one. The order is important.
The first potion recipe is - credit to suning who originally posted this and I couldn't figure it out -:
Interact with the cauldron. Nothing will happen as you need fire. Check the candles on the wall and then the cauldron to light a fire (in case you can't light it, you need an item that is in the top left bookcase in the main room, you need to choose the second option to get it and then interact with the candles again - credit to Umbraunt for this info) and then use the top option to make the potion. Use the potion, you will change forms and then run to the small door. *getting hit a lot of times by the goblins in this form triggers a different scene*
I'll define this part as the "small" part of the map. Interact with everything in the room with the bed and you might notice she can't really read now. So you have to go back to the laboratory and grab the letter chart at the leftmost books while dodging the goblins. Back at the "small" room interact with the right side of the left bookcase to find a book about a fairy. Interact with the drawer next to it then and you will get the fairy.
Go back to the laboratory, get rid of the goblins, get the red book on the floor and the empty bottles. Now go back to the "small" room and check the left side of the right bookcase. It says that to take the flame out you need 4w. Well water starts with w right? We will get to it soon. Leave through the bottom exit to arrive at the green tile room.
At this room we have two objectives. The first one is to make all tiles green to open the top door. To do so you need to follow a certain path that is shown on the image below:
- can't use external links, so its at the album on my profile -
After that the top door will open. The left exit is a dead end that will be used later. On the top "small" room interact with everything and fill the 4 glasses you just got back at the laboratory with water by using the jar. Now you have to go back to the laboratory and make the potion to remove the flame that you saw in the right bookshelf in the "small" room. This has to be done now for the A ending. Don't forget to get the bottles back after making the potion. Now, go to the fireplace, use the potion and get the charcoal.
Next, you will have to make a certain shape on the green floor to get ending A or B. You can see the shape you need by looking at the map you got at the top "small" room. Use the left door to reset the tiles and start from there. It should look like in this image here (the floor will lock once you get it right): -in profile album-
Now go to the top room and get the water at least one time. Go back to the laboratory. You need a potion to go back to normal so you can jump the water tiles back in the water room. Talk with the scared goblins at the cell and each will say a letter, also notice that the goblins are named A, B, C or D which corresponds to the placement. This is what each of them says: A-r , B-y, C-wa, D-g. So, its red, yellow, water and green. Use the potion and go back to the first room.
Here use the top and bottom summoning circles. After both summons you can finally open the left box to get the mushroom. Here is where you can choose the endings. For ending D check the right side of the bookcase in this room (might need to interact with it more than once) and then use the middle circle *triggers a scene, but you can't go back after it, so don't save, also the scene and the ending differs depending on your clothes*. Choose second then first option. You will be in a weird room with nothing to interact except the circle. Do it and the ending will start.
For ending C ignore the next paragraph.
Remember the big circle you can see on the map? Well, if you noticed the water room doesn't really look like it has the circle part. So go there, lower the water and interact with the 2 pillars that are closest to the math puzzle room (they're smaller than the other pillars). You're now able to push them. Push them to the bottom right, next to some pillars, all the way to the southern wall. There is still a spot left right next to the single pillar that was there (now to the left of those two you've placed). Push the small pillar you used way back to go south into that spot. Now raise the water (a platform will appear when you try to walk where those two pillars were, it also appears where the small one was, so you can still go to the laboratory if you want) and it should look like this: - in profile album -
Go back to the first room. If you look at the map you will notice that there is a hidden path on the bottom right. Move the three boxes to the left (second option) and you will find a hidden stairway. Midway through the hallway you will be asked to eat the mushroom. Eating it (first option) results in ending A and not eating it in ending B later on (if you've completed the big circle in the green room and in the water room). I'm not sure if it changes anything on ending C, but it probably doesn't.
On the next room, go to the upper left and turn on the lights. Step on the circle and you will have to guess who is lying and the answer is D. Now go in the last room, use the circle and you will get the ending.
There might be some mistakes or confusing parts. I think the images cover most of them though.
Seeing as there were some interest in this game and it isn't one of the friendliest game for people with limited japanese reading abilities like me I'll provide a walkthrough. There will be two main spoiler boxes, one gives base directions, almost a flowchart, so it won't solve any puzzle answers and the other is the complete one with the A ending (which was a pain to find) but also how to access the other ones.
PS. I'll be assuming you check all the obvious objects like swords, books and jars for the sake of not making this too big.
PS 2. For the first scene, watch the tutorial (second option at game start).
PS 3. There are three scenes that you can get by drinking a lot of water. Its one for normal clothes, one for swimsuit and one when you get younger. I'm not 100% sure but I think you can't drink anymore water when you trigger one of them so don't save after triggering it (seeing it and not saving will still add it to your gallery)
PS4. Almost all scenes give a game over.
Game Flowchart:
Jar -> Open chest -> Water room -> Lower tile path (Key) -> Clothes -> Math Puzzle -> Water path (swimsuit) -> Water path room -> Lever -> Lower tile path -> First room (ignore left wooden box for ending A) -> Cells -> Laboratory -> Potion -> Small passage -> "small" bedroom -> laboratory -> green tile room -> top "small" room -> Laboratory -> Fireplace -> Goblin cell -> Laboratory -> First room -> Summon -> Left wooden box -> Water room -> First room -> Find hidden stairs -> Ending
For ending A go through the hidden stairs and use the mushroom when prompted to and keep going, for ending B don't use it.
For ending D choose second then first option at the middle summon ring in the first room (after getting the mushroom, don't need to go to secret path, just get it.
And for ending C go through the secret path without making the big circle (water room and green tile room).
For endings A, B and C then: -> Hidden path -> 5 man circle -> Last room
Walkthrough:
First off, interact with everything once (CG mode item is hidden on the bed). Then, as you got an empty bottle, transfer the water from the upper jar to the lower one using the second option on the upper one and the second on the lower one (except for the first time).
Check the upper jar when empty to get a cube. Use the balance to find its weight (apparently its random, you can get it from trial and error). Then, as you might have noticed a box had circle + square + triangle written. Circle is the number at the paper close to the door = 9. Square is the cube weight. Triangle is the number of triangles on all magic circles on the room, which includes one on a paper you get and on the one close to the door which totals 5 and they've got 8 triangles equaling 40. So its cube weight + 49.
Now proceed to the next room, go through the bottom path, get the key and the octopus will attack you, *bottom option gives a scene*, use the top option to use the sword to get it away, go back to your room, use the drawer on the right to change clothes. Use the drawer again and it will tell you about the swimsuit. Use it again and choose the bottom option to wear it.
Go through the top path and there is the math puzzle. You need to complete each line. The key to it is to start from the right line * in all explanations X = a non defined number aka. empty space or a number that doesn't really matter * (only one way for something + X2 to result a number that ends on 0) or the middle empty space on the bottom one (only two numbers there can result in a 2 if multiplied by a number that's X2, and one of the two options would require that both of the other empty spaces be the same which isn't possible) as their logic does not depend on the other lines.
After that clear the top and mid (vertical) lines. Now it gets a bit more complex. Look at the middle horizontal line and the left one. So, for the empty space those lines share we need a number that satisfies two criterias: 1- won't make a 2X number overblow two digits. 2- Fits with the remaining possibilities of 2 times X8. Only one of the remaining numbers fit both of those requirements. Complete the middle (horizontal line). Now go back to the bottom line and there will be only a single number that doesn't overblow two digits on the empty space left at the multiplication (X2). Just follow what you have of the math operations to place the remaining numbers.
Interact with the door and it will open. Get the item and use the lever. On the math room interact with the center tile and the + on the right to get the rope and the medicine.
Here is a photo with the math room clear method and the hidden tiles:
Actually I can't post links and the attachment size limit is too low, so click on my profile and check the album tab to the right
Now go down and into the room to the upper right. Go through the water to get an item (need swimsuit) and then to the door on the right. You will find a bar there the opens some wooden boxes. Open the one right outside, place the stairs on the math room exit, but before you go down, push the small platform directly under the second pillar on the bottom path to be able to go to the bottom exit later. Now go back to the math room and pull the lever. Then go down the new path and the octopus will show up again. *first option gives a scene, it has two variations depending on clothes used*
, use the second option and then get the octopus part.
If you're still with the swimsuit it will take you back to the first room to change.
There is one very important thing here. Do NOT open the left box (the one with the code next to the chest). The reason for this is that it has a mushroom that you need to get ending A but if you get it early it will be used for a summon. You will soon get another item to replace it in the summon.
Get the shield, fill your bottle with water on the lower jar and go through the new path. Get the item on the floor, open the cell, get the bottle and past the goblins. *Get hit a lot of times by the goblins for a scene*
Now you're on the laboratory of non-japanese doom . First, open the small door. * interact with the small door again after opening it and choose the second option for a scene*. Interact with the whole room and now its potion time. To make it go to the almost empty table on the bottom part of the lab and after facing the table and prompting a message (ex: 1番目の素材は・・・) go to the item menu and choose the correct one. The order is important.
The first potion recipe is - credit to suning who originally posted this and I couldn't figure it out -:
*making the wrong potion will trigger a scene*
Interact with the cauldron. Nothing will happen as you need fire. Check the candles on the wall and then the cauldron to light a fire and then use the top option to make the potion. Use the potion, you will change forms and then run to the small door. *getting hit a lot of times by the goblins in this form triggers a different scene*
I'll define this part as the "small" part of the map. Interact with everything in the room with the bed and you might notice she can't really read now. So you have to go back to the laboratory and grab the letter chart at the leftmost books while dodging the goblins. Back at the "small" room interact with the right side of the left bookcase to find a book about a fairy. Interact with the drawer next to it then and you will get the fairy.
Go back to the laboratory, get rid of the goblins, get the red book on the floor and the empty bottles. Now go back to the "small" room and check the left side of the right bookcase. It says that to take the flame out you need 4w. Well water starts with w right? We will get to it soon. Leave through the bottom exit to arrive at the green tile room.
At this room we have two objectives. The first one is to make all tiles green to open the top door. To do so you need to follow a certain path that is shown on the image below:
- can't use external links, so its at the album on my profile -
After that the top door will open. The left exit is a dead end that will be used later. On the top "small" room interact with everything and fill the 4 glasses you just got back at the laboratory with water by using the jar. Now you have to go back to the laboratory and make the potion to remove the flame that you saw in the right bookshelf in the "small" room. This has to be done now for the A ending. Don't forget to get the bottles back after making the potion. Now, go to the fireplace, use the potion and get the charcoal.
Next, you will have to make a certain shape on the green floor to get ending A or B. You can see the shape you need by looking at the map you got at the top "small" room. Use the left door to reset the tiles and start from there. It should look like in this image here (the floor will lock once you get it right): -in profile album-
Now go to the top room and get the water at least one time. Go back to the laboratory. You need a potion to go back to normal so you can jump the water tiles back in the water room. Talk with the scared goblins and each will say a letter, also notice that the goblins are named A, B, C or D which corresponds to the placement. This is what each of them says: A-r , B-y, C-wa, D-g. So, its red, yellow, water and green. Use the potion and go back to the first room.
Here use the top and bottom summoning circles. After both summons you can finally open the left box to get the mushroom. Here is where you can choose the endings. For ending D check the right side of the bookcase in this room (might need to interact with it more than once) and then use the middle circle *triggers a scene, but you can't go back after it, so don't save, also the scene and the ending differs depending on your clothes*. Choose second then first option. You will be in a weird room with nothing to interact except the circle. Do it and the ending will start.
For ending C ignore the next paragraph.
Remember the big circle you can see on the map? Well, if you noticed the water room doesn't really look like it has the circle part if you noticed. So go there, lower the water and interact with the 2 pillars that are closest to the math puzzle room (they're smaller than the other pillars). You're now able to push them. Push them to the bottom right, next to some pillars, all the way to the southern wall. There is still a spot left right next to the single pillar that was there (now to the left of those two you've placed). Push the small pillar you used way back to go south into that spot. Now raise the water (a platform will appear when you try to walk where those two pillars were, it also appears where the small one was, so you can still go to the laboratory if you want) and it should look like this: - in profile album -
Go back to the first room. If you look at the map you will notice that there is a hidden path on the bottom right. Move the three boxes to the left (second option) and you will find a hidden stairway. Midway through the hallway you will be asked to eat the mushroom. Eating it (first option) results in ending A and not eating it in ending B later on (if you've completed the big circle in the green room and in the water room). I'm not sure if it changes anything on ending C, but it probably doesn't.
On the next room, go to the upper left and turn on the lights. Step on the circle and you will have to guess who is lying and the answer is D. Now go in the last room, use the circle and you will get the ending.
There might be some mistakes or confusing parts. I think the images cover most of them though.
Well, even though I suck at japanese, I managed to find on my own the circle and triangle answers, how the fck do you get the square one?
I know it has been mentioned here you need to take out the water of something and the measure the weight of the cube? What does that even mean? lol
Edit* So, I found out that you need to transfer water from one pot to another and after all the water is out you find out a cube and you can use the cube on the balance, so I'm guessing you need to measure the weight of the cube, but I have no idea what I need to follow to find out its weight :/
Edit** Nvm, you just have to notice when the image changes when the cube is heavier than the counter-weights and then you'll just too keep rounding til you find the right weight *DUH*
Edit*** I'm not getting the scene with the octopus?!?! Is there anything I need to for it or do I have the wrong version of the game?
Edit**** Finally, I've finished the game. I wouldn't get ending C or A without the walkthrough that's for sure lol.
Apparently due to the server migration the walkthorugh pictures that were in my album are broken. The thumbnails still work but I know that they're not all that useful as you can barely see important stuff on it.
I've tried to reupload them, create another album and so on but no matter what I try I get a "Failed to write file. Check disc quotas and permissions for the path" error.
EDIT: Album reuploaded. Thumbnails doesn't work now but the full image works fine.
")