Re: (Nutaku) Milenium War Aigis (English Version)
Good timeofaday, brave Princes! It is that time of the year, with old one coming to an end and new one approachng. And so, it is a time for our only special eventaside from Summer Vacation Celebration with Great Odette's Disaster revivals ")
the Second Year End Gold Rush! (even if it was supposed to be fifth one...)
Event runs: 2016-12-27 to 2017-01-06
Rewards
This is a Gold Rush event. One new map will be added every day for 10 maps total.
Maps
Comments about the event
Continued in next post...
Good timeofaday, brave Princes! It is that time of the year, with old one coming to an end and new one approachng. And so, it is a time for our only special event
Event runs: 2016-12-27 to 2017-01-06

Rewards
This is a Gold Rush event. One new map will be added every day for 10 maps total.
Aim for drop completion on event maps to get a specific Gold rarity Shrine unit as a reward!
This year lineup consists of:
But wait, there's more! Achieve the drop completion on a map and get a specific platinum event unit afterwards! (Said unit is already on the map, and drops even without the completion, but with abysmal rates. Good thing is they are not needed for drop completion) So who goes where?
This year lineup consists of:
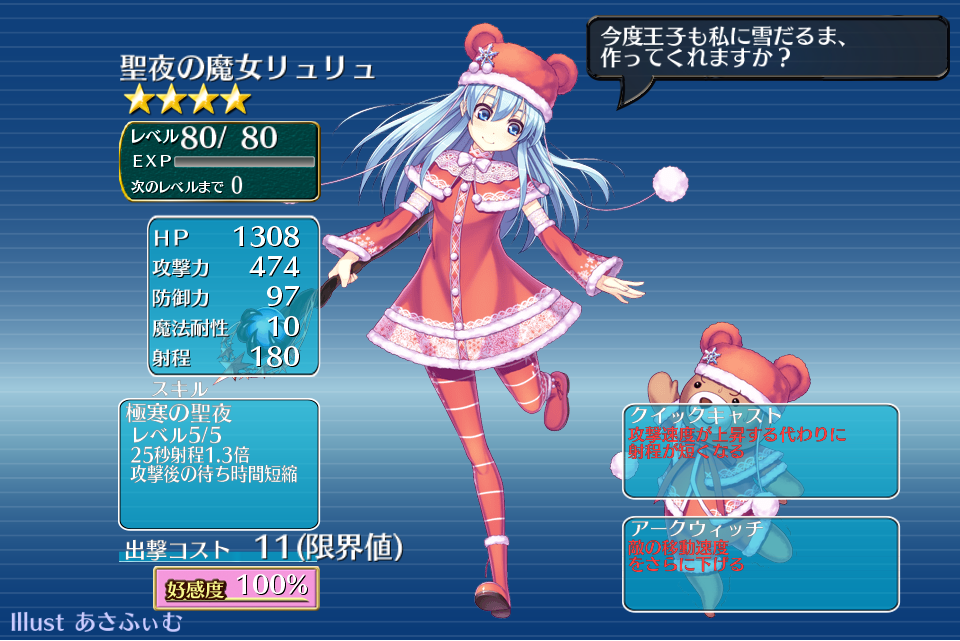
- Map 1:
You must be registered to see the links- Wow, an seasonal holiday-appropriate unit AT the time of a holiday? Nice! This Gold Witch (yes, witch, not mage of shaman or whatever) possesses Magic Enhance skill, same as lovely silver Naynia, placing her firmly in the middle of Cloris - Yuyu pair skill and stat-wise. Awakeining weirdly reduces her range (to 190 compared to standard 220) in exchange of increased attack speed. Skill Awakening trades attack increase of previous skill for even more powerful range increase and even more attack speed.
- Map 2:
You must be registered to see the links- a male gold Ninja with Increase Attack III skill, he's an obvious upgrade over Saizo for your male-only team.) Awakeinig just decreases his cost (even further than it does for oter ninjas), and Skill Awakening turns him into a melee fighter with 2.5x attack power and one-shot resurrection. Oh, and he also has an interesting distinction of being one of the few ninjas who can still block (with his Skill Awakening) on DMM side, where one of patches made all ninjas 0-block) -- Side note: banner DON'T list him and says there's 10 missions, so there's a big chance his map is cut out of our version.
- Map 3:
You must be registered to see the links- a gold female Heavy Infantry who is even better than plat ones! Off-skil, she has more defense than even Gellius!! And not that far behind in skill, with the power of valuable Increase Defense III! And providing sizable defense buff to all heavies with Awakening ability!!! Definitive must-get for every player. On a side note, Skill Awakening turns her into adamantine clad counter-attacking porcupine)
- Map 4:
You must be registered to see the links- a better gold male Mage of the two, providing migher attack for the same Splash Attack II skill as Cyrus. Awakening slows his attacks a bit in exchange for better range, while Skill Awakening, once again shared with Syrus (to the point they appear togever in its attack animation!) adds power multiplier to present splash radius increase, but paralyses him after aw'skill expires.
- Map 5:
You must be registered to see the links- a gold female Avanger that boasts a safety net one-shot revival skill to complement her class's low-HP-attack-increase trait. Awakenig adds a chance of critical blow on top of that, and skill awakening allows to increase that chance.
- Map 6:
You must be registered to see the links- a gold rarity male Vampire Hunter with Increase Range II skill to counter his class's inherent shortsightedness. Awakening adds a chance to fire another volley straight after previous one without a downtime. Skill Awakening gives him (near-)suicide button, exploding for 7x true damage on all enemise in near doubled radius in exchange for 90% of his current HP.
- Map 7:
You must be registered to see the links- a gold Valkyrie with Increase Attack III skill. Awakening increases her attack power but decreases attack speed, hurting her ability to do her job in handling rushes as often as helping her deal with bosses. Skill Awakening gives her a skill that after initial charge-up turn increases both her attack and defense, gives her regeneration and doubles UP payoffs for her kills;
- Map 8:
You must be registered to see the links- a gold male Samurai with thrusty Increase Defence IV skill to protect his behind while he turns all three blocked enemies into sushi at once. Awakening does not reach his dead fish eyes) but accentuates his dependable nature even more, by buffing defense of all Samurai in the team. Skill Awakening trades some defense multiplier and one attack (not block) target for HP multiplier for that hard hitting one-shotting bosses).
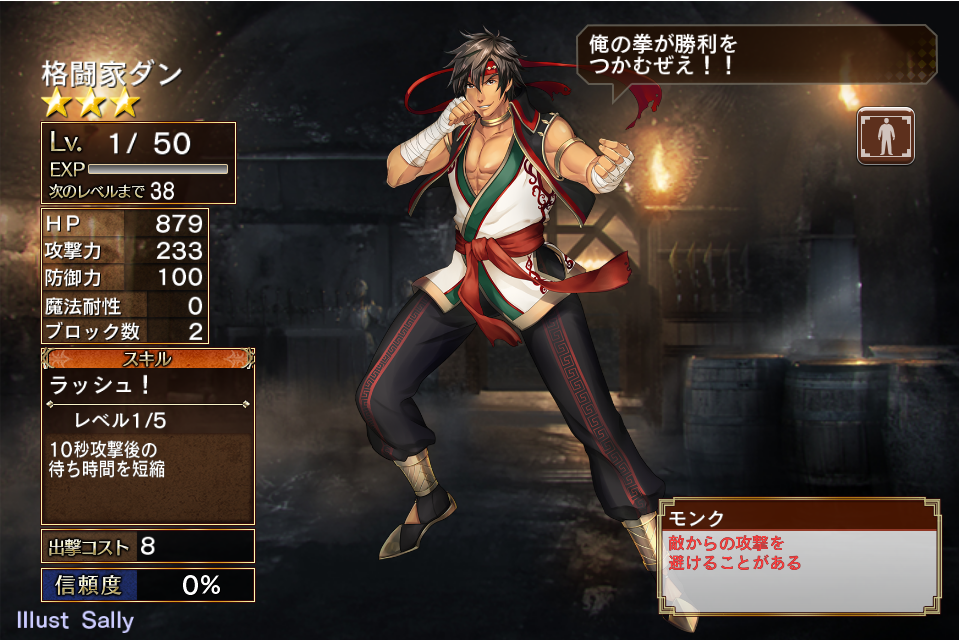
- Map 9:
You must be registered to see the links- a gold female Monk with powerful Rush! skill that turns her into machinegun of fist blows. Awakening capitalises on that by adding the chance to deal true damage instead of physical one, that really adds up with fast attack speed. Skill Awakening trades attack spead for attack multiplier and HP increase, effectively repurposing her from rush clearer to boss fighter.
- Map 10:
You must be registered to see the links- third gold rarity Reinforcement soldier, HP-based one, and only male among them.) In contrast to his female peers, his Awakening ability does not buff the team but instead gives him a chance to deal a critical hit. Also in contrast to them, his Skill Awakening is actually useful for his role, as it makes his skill automatically activate as soon as it becomes available!
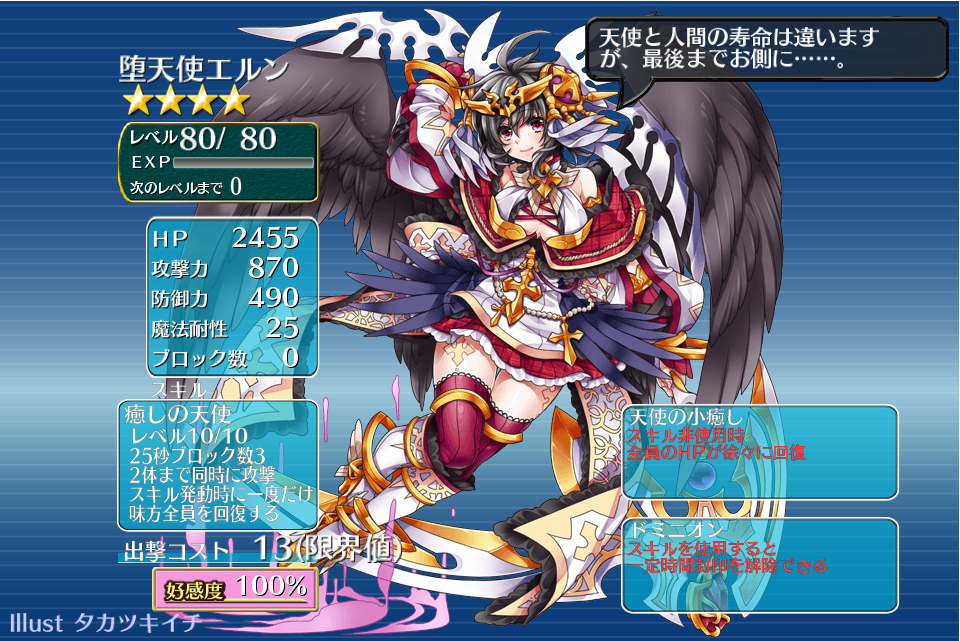
- Map 11:
You must be registered to see the links- the first and only female gold Angel and an obvious upgrade to our lovely silver futa. All Angels we have share same basic skill, so you can increse it with spare Niels. Awakening adds the HP regeneration for entiree party when skill is not active, and Skill Awakening heals everybody once in addition to usual attack mode engagement)
But wait, there's more! Achieve the drop completion on a map and get a specific platinum event unit afterwards! (Said unit is already on the map, and drops even without the completion, but with abysmal rates. Good thing is they are not needed for drop completion) So who goes where?
- Map 1:
You must be registered to see the links;
- Map 2:
You must be registered to see the links(Side note: banner DON'T list her and says there's 10 missions, so there's a big chance this map is cut out of our version.);
- Map 3:
You must be registered to see the links;
- Map 4:
You must be registered to see the links;
- Map 5:
You must be registered to see the links;
- Map 6:
You must be registered to see the links;
- Map 7:
You must be registered to see the links;
- Map 8:
You must be registered to see the links;
- Map 9:
You must be registered to see the links;
- Map 10: Should have been Yurina T_T. Now is
You must be registered to see the links;
- Map 11: Should have been Chloe T_T. Now is
You must be registered to see the links.
Maps
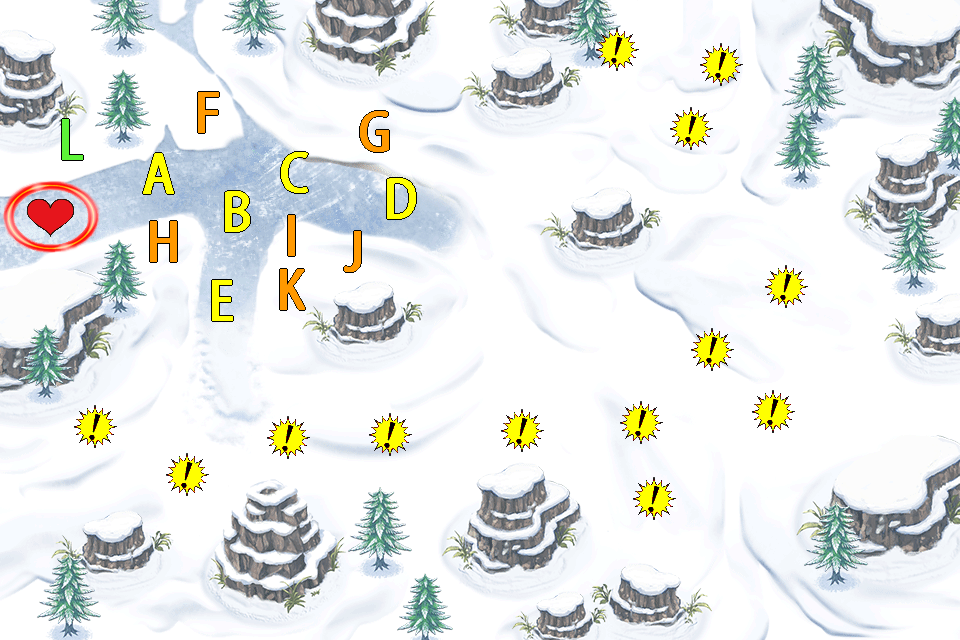
Lost Santa (E)
Santa girl is beig attacked by demons. Let's help them!)
Gimmick: Blizzard (periodically everebody on map (both our units and enemies) have their range halved. Enemies slows down. Blizzard acclimated units (both our and enemy) are immune and have attack increased)
Map:
Video:
Drops:

 x2
x2

Completion:

Bonus Platinum:

The shadow of the big kite (N) - signs point on this map not maiking to our shore.( So don't be surprised to not see it
Ninja bombers. On kites. Beware the skies!
Gimmick: -
Map:
Video:
Drops:

 x2
x2

Completion:

Bonus Platinum:

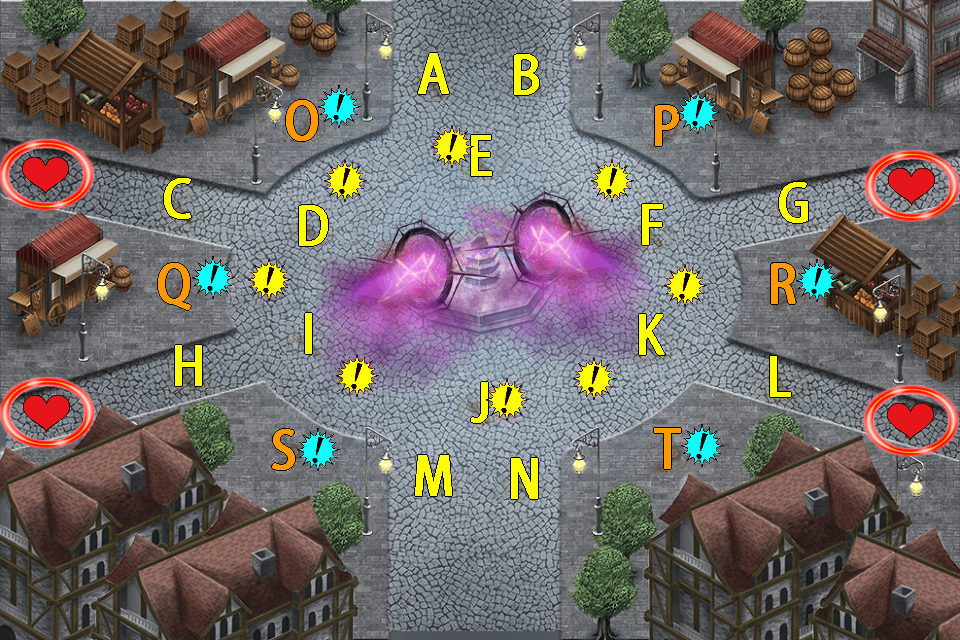
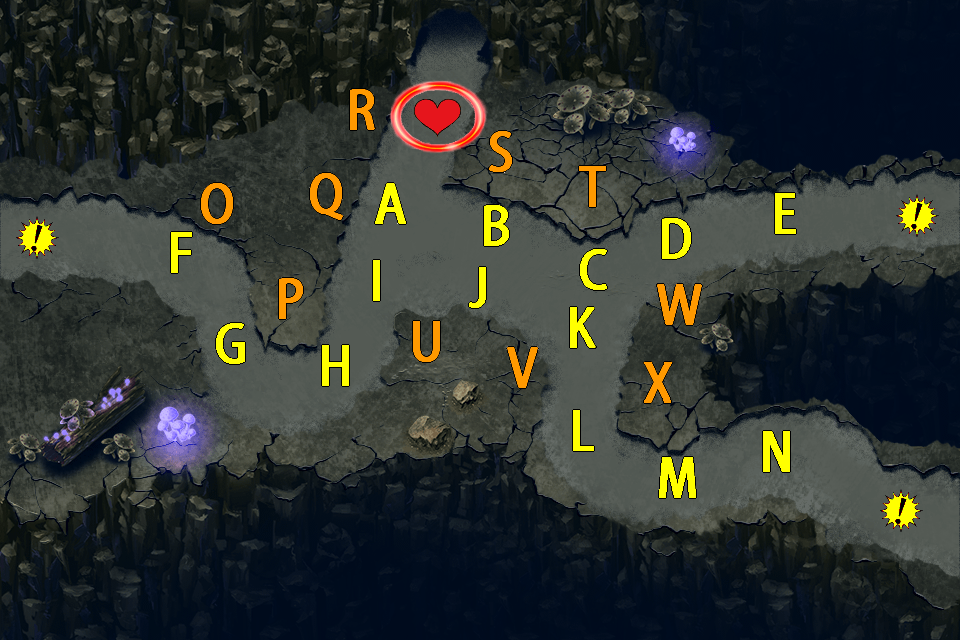
Assault of Darkness (N)
A Makai portal suddenly appeared. Defeat the demons guarding it to close the gate!
Gimmick: -
Map:
Video:
Drops:

 x2
x2

Completion:

Bonus Platinum:

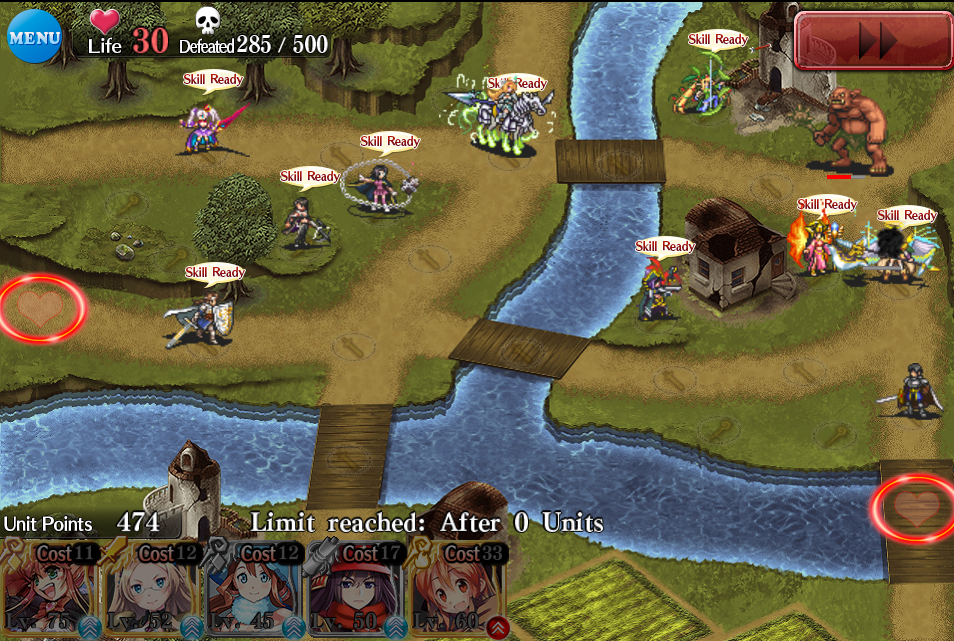
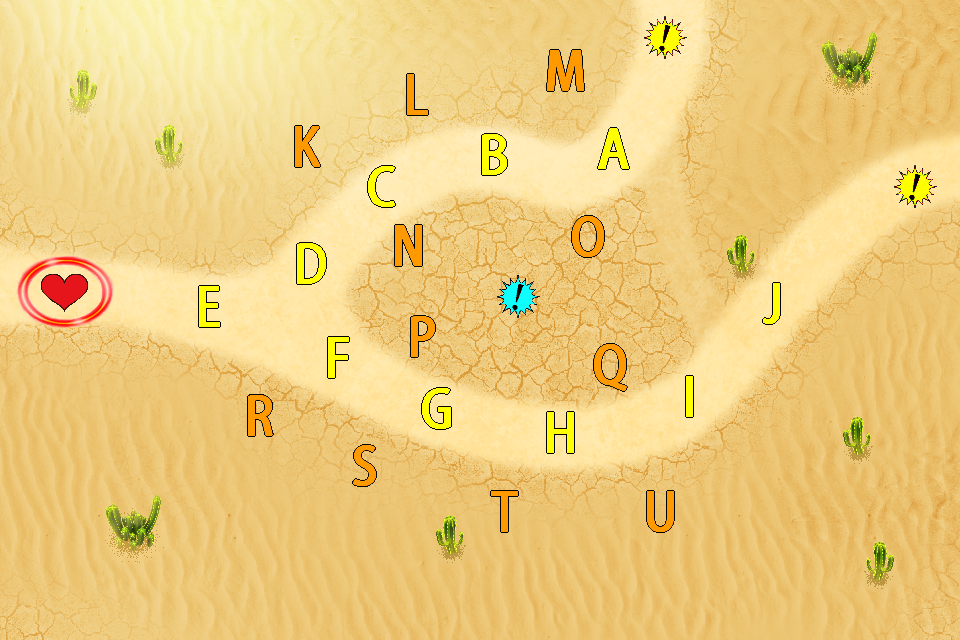
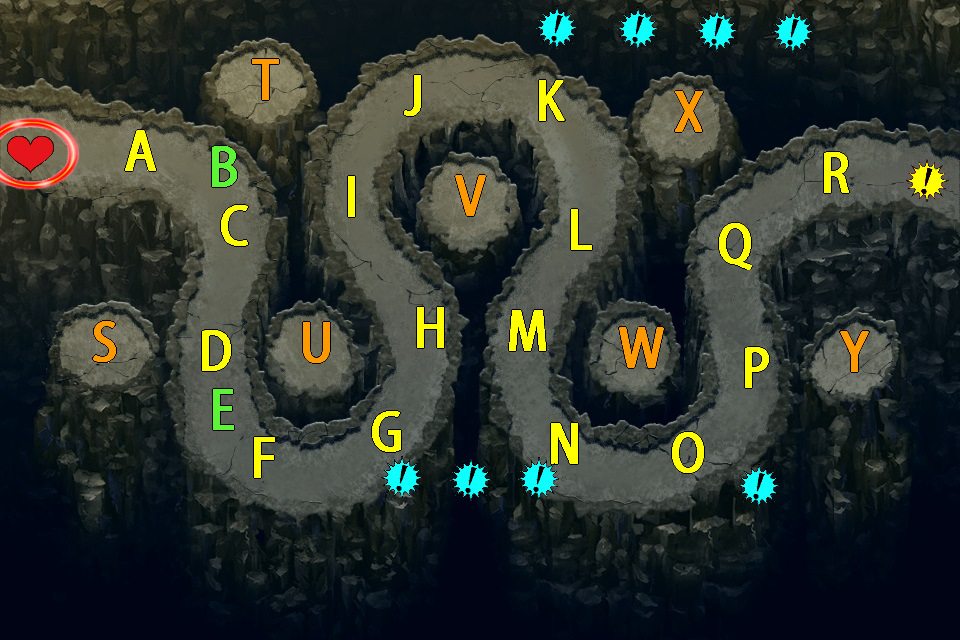
The Stone Giant (N)
Avoid provoking the mighty Stone Golem and seize the victory!
Gimmick: Desert heat (-20% current health on deployment)
Notes: It is not necessary to kill the golem to 3* and drop complete the map, so just avoid placing / leaving your units near it and let it go in peace) Unless you want some superboss poindin, that's it)
Map:
Video:
Golem kill:
Drops:

 x2
x2

Completion:

Bonus Platinum:

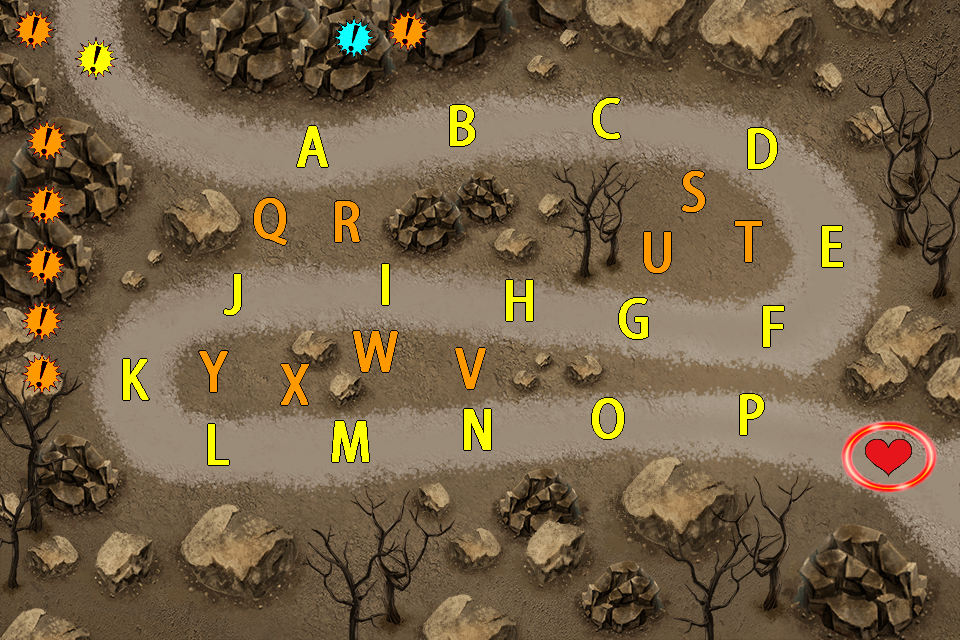
Assault of the Ancient Weapons (N)
Ancient war puppets run amok once more! Pay attenton to exploding broken ones.
Gimmick: -
Map:
Video:
Drops:

 x2
x2
Completion:

Bonus Platinum:

Avenger's Memories (N)
A mysterious girl who appeared in the night city. Calling hersels a vampire... Pay attention to attacks with powerful paralysis!
Gimmick: -
Map:
Video:
Drops:
 x2
x2
Completion:

Bonus Platinum:

New Year's Eve Battle (N)
The enemies of the past gathered together! Break through their combined might!
Gimmick: -
Map:
Video:
Drops:

 x2
x2
Completion:

Bonus Platinum:

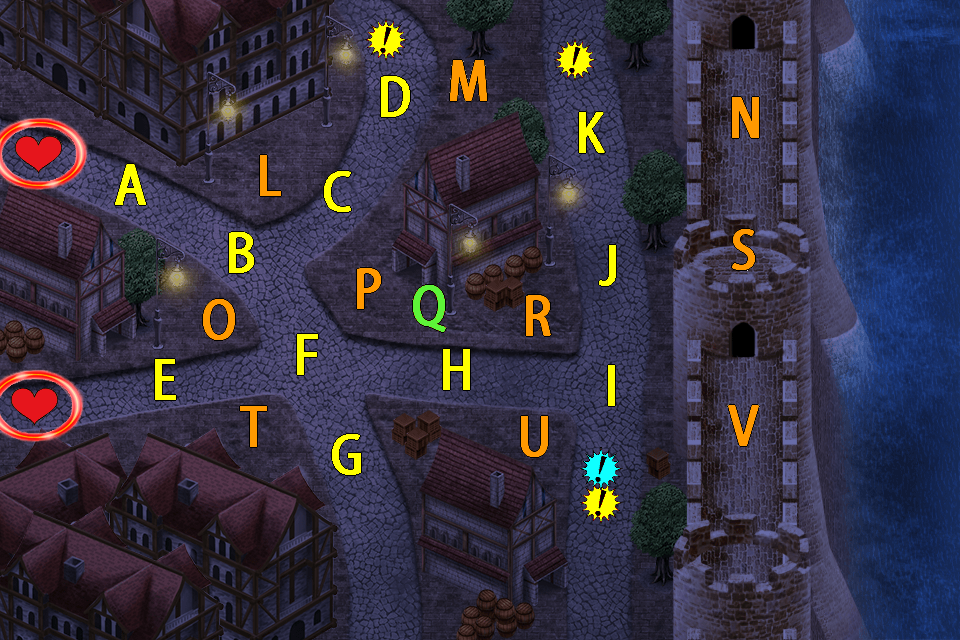
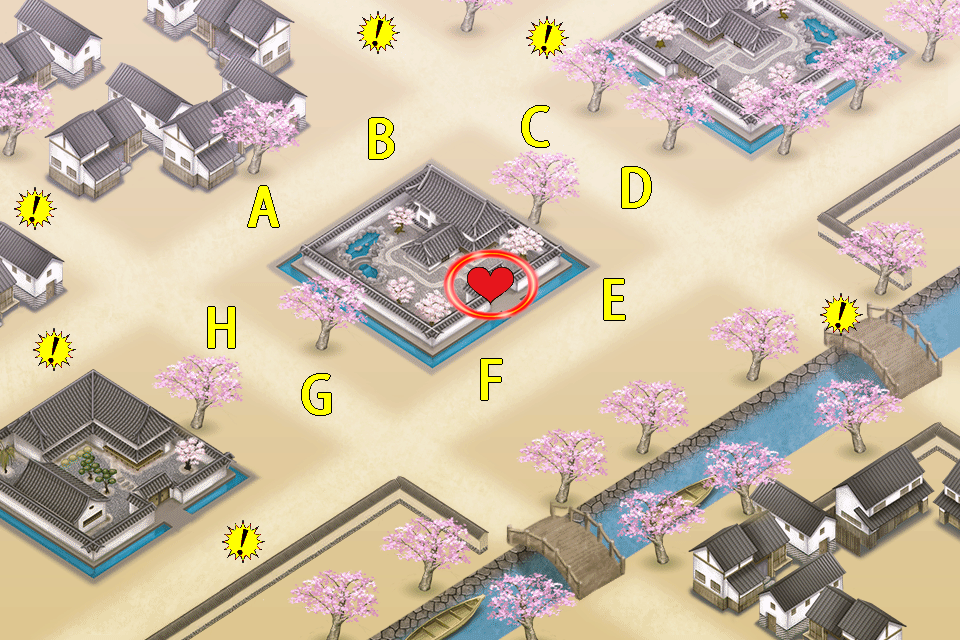
Princess Shrine Visit (H)
A magical sword of merciless anger is swung down on the prince who angered princesses! (by not inviting them along on Hatsumōde (New Year's First Shrine Visit)
Gimmick: -
Map:
Video:
Drops:
 x2
x2

Completion:

Bonus Platinum:

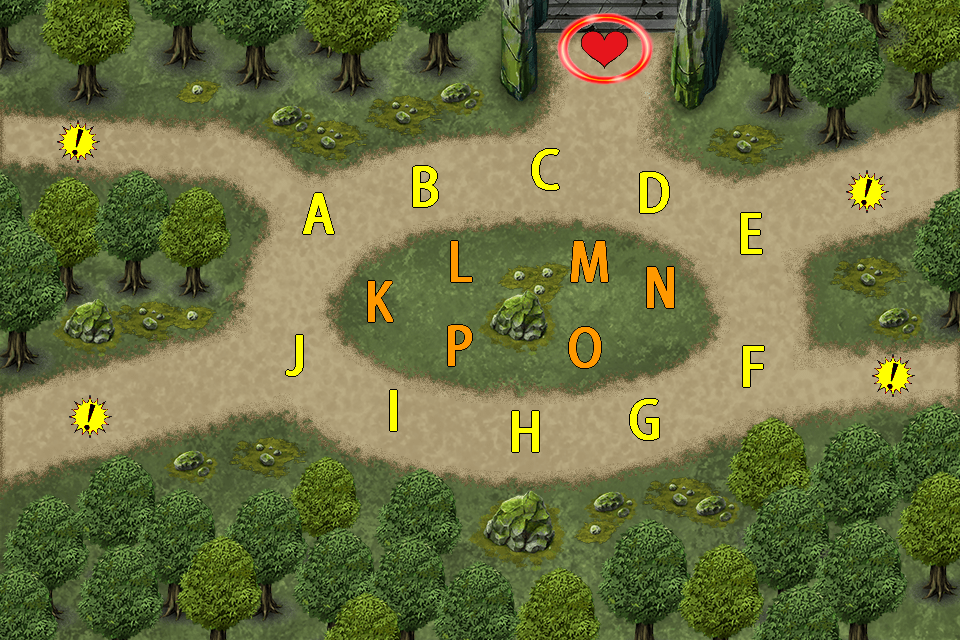
A Battle of Warriors (N)
A fighter challenges you on the match without pesky arrows, bullers and magic. So le't meet him fist to fist!
Gimmick: Melee units only
Map:
Video:
Drops:

 x2
x2
Completion:

Bonus Platinum:

Black Wave (N)
An evil dark aura saps power away. Break through overwhelmingly disadvantageous situation and grasp victory!
Gimmick: -
Map:
Video:
Drops:
x2
Completion:

Bonus Platinum:

Fallen Angels (N)
The seal is broken and the angel corps, from the former millennium war, appears again. Cooperate with two fallen angels to prevent invasion!
Gimmick: -
Map:
Video:
Drops:


Completion:

Bonus Platinum:

Code:
┌──────────┬────╥────────────┬──────╥────────────┬────╥────────────┬────┐
│ [B]Charisma[/B] │ 30 ║ [B]Experience[/B] │  250 ║ [B]Initial UP[/B] │ 20 ║ [B]Max deploy[/B] │  8 │
├──────────┼────╫────────────┼──────╫────────────┼────╫────────────┼────┤
│ [B]Stamina[/B]  │  2 ║ [B]Gold @ 3*[/B]  │ 1200 ║ [B]Life[/B]       │ 20 ║ [B]Enemies[/B]    │ 28 │
└──────────┴────╨────────────┴──────╨────────────┴────╨────────────┴────┘Gimmick: Blizzard (periodically everebody on map (both our units and enemies) have their range halved. Enemies slows down. Blizzard acclimated units (both our and enemy) are immune and have attack increased)
Map:
You must be registered to see the links
Completion:
Bonus Platinum:
The shadow of the big kite (N) - signs point on this map not maiking to our shore.( So don't be surprised to not see it
Code:
┌──────────┬────╥────────────┬──────╥────────────┬────╥────────────┬────┐
│ [B]Charisma[/B] │ 30 ║ [B]Experience[/B] │  250 ║ [B]Initial UP[/B] │ 25 ║ [B]Max deploy[/B] │  8 │
├──────────┼────╫────────────┼──────╫────────────┼────╫────────────┼────┤
│ [B]Stamina[/B]  │  2 ║ [B]Gold @ 3*[/B]  │ 1200 ║ [B]Life[/B]       │ 20 ║ [B]Enemies[/B]    │ 66 │
└──────────┴────╨────────────┴──────╨────────────┴────╨────────────┴────┘Gimmick: -
Map:

You must be registered to see the links
Completion:
Bonus Platinum:
Assault of Darkness (N)
Code:
┌──────────┬────╥────────────┬──────╥────────────┬────╥────────────┬────┐
│ [B]Charisma[/B] │ 30 ║ [B]Experience[/B] │  250 ║ [B]Initial UP[/B] │ 30 ║ [B]Max deploy[/B] │  8 │
├──────────┼────╫────────────┼──────╫────────────┼────╫────────────┼────┤
│ [B]Stamina[/B]  │  2 ║ [B]Gold @ 3*[/B]  │ 1200 ║ [B]Life[/B]       │ 10 ║ [B]Enemies[/B]    │ 14 │
└──────────┴────╨────────────┴──────╨────────────┴────╨────────────┴────┘Gimmick: -
Map:
You must be registered to see the links
Completion:
Bonus Platinum:
The Stone Giant (N)
Code:
┌──────────┬────╥────────────┬──────╥────────────┬────╥────────────┬────┐
│ [B]Charisma[/B] │ 30 ║ [B]Experience[/B] │  250 ║ [B]Initial UP[/B] │ 20 ║ [B]Max deploy[/B] │  8 │
├──────────┼────╫────────────┼──────╫────────────┼────╫────────────┼────┤
│ [B]Stamina[/B]  │  2 ║ [B]Gold @ 3*[/B]  │ 1200 ║ [B]Life[/B]       │ 15 ║ [B]Enemies[/B]    │ 37 │
└──────────┴────╨────────────┴──────╨────────────┴────╨────────────┴────┘Gimmick: Desert heat (-20% current health on deployment)
Notes: It is not necessary to kill the golem to 3* and drop complete the map, so just avoid placing / leaving your units near it and let it go in peace) Unless you want some superboss poindin, that's it)
Map:
You must be registered to see the links
You must be registered to see the links
Golem kill:
You must be registered to see the links
You must be registered to see the links
Completion:
Bonus Platinum:
Assault of the Ancient Weapons (N)
Code:
┌──────────┬────╥────────────┬──────╥────────────┬────╥────────────┬────┐
│ [B]Charisma[/B] │ 30 ║ [B]Experience[/B] │  250 ║ [B]Initial UP[/B] │ 20 ║ [B]Max deploy[/B] │  8 │
├──────────┼────╫────────────┼──────╫────────────┼────╫────────────┼────┤
│ [B]Stamina[/B]  │  2 ║ [B]Gold @ 3*[/B]  │ 1200 ║ [B]Life[/B]       │ 25 ║ [B]Enemies[/B]    │ 48 │
└──────────┴────╨────────────┴──────╨────────────┴────╨────────────┴────┘Gimmick: -
Map:
You must be registered to see the links
Completion:
Bonus Platinum:
Avenger's Memories (N)
Code:
┌──────────┬────╥────────────┬──────╥────────────┬────╥────────────┬────┐
│ [B]Charisma[/B] │ 30 ║ [B]Experience[/B] │  250 ║ [B]Initial UP[/B] │ 30 ║ [B]Max deploy[/B] │  8 │
├──────────┼────╫────────────┼──────╫────────────┼────╫────────────┼────┤
│ [B]Stamina[/B]  │  2 ║ [B]Gold @ 3*[/B]  │ 1200 ║ [B]Life[/B]       │ 20 ║ [B]Enemies[/B]    │ 28 │
└──────────┴────╨────────────┴──────╨────────────┴────╨────────────┴────┘Gimmick: -
Map:
You must be registered to see the links
Completion:
Bonus Platinum:
New Year's Eve Battle (N)
Code:
┌──────────┬────╥────────────┬──────╥────────────┬────╥────────────┬────┐
│ [B]Charisma[/B] │ 30 ║ [B]Experience[/B] │  250 ║ [B]Initial UP[/B] │ 20 ║ [B]Max deploy[/B] │ 10 │
├──────────┼────╫────────────┼──────╫────────────┼────╫────────────┼────┤
│ [B]Stamina[/B]  │  2 ║ [B]Gold @ 3*[/B]  │ 1200 ║ [B]Life[/B]       │ 20 ║ [B]Enemies[/B]    │ 81 │
└──────────┴────╨────────────┴──────╨────────────┴────╨────────────┴────┘Gimmick: -
Map:
You must be registered to see the links
Completion:
Bonus Platinum:
Princess Shrine Visit (H)
Code:
┌──────────┬────╥────────────┬──────╥────────────┬────╥────────────┬────┐
│ [B]Charisma[/B] │ 30 ║ [B]Experience[/B] │  250 ║ [B]Initial UP[/B] │ 5 ║ [B]Max deploy[/B] │  8 │
├──────────┼────╫────────────┼──────╫────────────┼────╫────────────┼────┤
│ [B]Stamina[/B]  │  2 ║ [B]Gold @ 3*[/B]  │ 1200 ║ [B]Life[/B]       │ 5 ║ [B]Enemies[/B]    │  5 │
└──────────┴────╨────────────┴──────╨────────────┴────╨────────────┴────┘Gimmick: -
Map:

You must be registered to see the links
Completion:
Bonus Platinum:
A Battle of Warriors (N)
Code:
┌──────────┬────╥────────────┬──────╥────────────┬────╥────────────┬────┐
│ [B]Charisma[/B] │ 30 ║ [B]Experience[/B] │  250 ║ [B]Initial UP[/B] │ 20 ║ [B]Max deploy[/B] │  8 │
├──────────┼────╫────────────┼──────╫────────────┼────╫────────────┼────┤
│ [B]Stamina[/B]  │  2 ║ [B]Gold @ 3*[/B]  │ 1200 ║ [B]Life[/B]       │ 20 ║ [B]Enemies[/B]    │ 24 │
└──────────┴────╨────────────┴──────╨────────────┴────╨────────────┴────┘Gimmick: Melee units only
Map:
You must be registered to see the links
Completion:
Bonus Platinum:
Black Wave (N)
Code:
┌──────────┬────╥────────────┬──────╥────────────┬────╥────────────┬────┐
│ [B]Charisma[/B] │ 30 ║ [B]Experience[/B] │  250 ║ [B]Initial UP[/B] │ 20 ║ [B]Max deploy[/B] │  8 │
├──────────┼────╫────────────┼──────╫────────────┼────╫────────────┼────┤
│ [B]Stamina[/B]  │  2 ║ [B]Gold @ 3*[/B]  │ 1200 ║ [B]Life[/B]       │ 15 ║ [B]Enemies[/B]    │ 40 │
└──────────┴────╨────────────┴──────╨────────────┴────╨────────────┴────┘Gimmick: -
Map:
You must be registered to see the links
Completion:
Bonus Platinum:
Fallen Angels (N)
Code:
┌──────────┬────╥────────────┬──────╥────────────┬────╥────────────┬────┐
│ [B]Charisma[/B] │ 30 ║ [B]Experience[/B] │  250 ║ [B]Initial UP[/B] │ 20 ║ [B]Max deploy[/B] │  8 │
├──────────┼────╫────────────┼──────╫────────────┼────╫────────────┼────┤
│ [B]Stamina[/B]  │  2 ║ [B]Gold @ 3*[/B]  │ 1200 ║ [B]Life[/B]       │ 15 ║ [B]Enemies[/B]    │ 40 │
└──────────┴────╨────────────┴──────╨────────────┴────╨────────────┴────┘Gimmick: -
Map:
You must be registered to see the links
Completion:
Bonus Platinum:
Comments about the event
Overall not that hard, but not without some interesting twists.
First map: Blizzard. It certainly makes things annoying by halving unit range, but enemies are pretty weak anyway.
Second map: Most likely didn't make it. Oh well. In an unlikely case it does appear, DO NOT let fliers come close to your units. You'll regret it.
Assault of Darkness: All enemies are on the map from the start, no new ones coming in. Hope you were raising some melee rangers))
The Stone Giant: If you want to take on a golem, then you need to prepare tokens or tank with eHP (health + defense) over 3000 and healers with combined heal over 1500 (as golem attacks twice as slow compared to the healer), in addition to units to deal with the small fry (and Maribel).
Assault of the Ancient Weapons: Broken variants are suicide bombers, like goblin sappres. Explosions are not that terribly powerful, but can be annoying. Kill them with superior ranged firepower away from your main line!)
Avenger's Memories: Say hello to Vincent (ally) and Eden (enemy)! Beware the werevolves coming through ghost-like Eden's one-touch paralysis. Pretty straightforward map anyway.
New Year's Eve Battle: Everybody you were facing in previous maps (minus Stone Golem) comes together. Have fun)
Princess Shrine Visit: Hell hath no fury... And all five princesses (and Shiho) are there to prove just that (even, especially if their anger is unfounded) No additional enemies, but all of them are magic attackers, so armor won't save you here. Witches are your best friends here. Beware Sybilla's rarged slash.
A Battle of Warriors: No ranged slots here, so hope you were raising some melee support))
Black Wave: Say hello again to our favorite Dark knight Commander and his lovely -80% attack debuff aura. Thankfully, mini-sized goblins lessen the impact of such loss, but still do take care.
Fallen Angels: Feel the power of the Black Angel! Thankfully, Sophie's on our side, so you may as well take advantage of her being pre-placed here) Oh, and Erun too)) Other than that, angels are NOT fliers, so they follow roads, can be blocked and don't take extra damage from archers.
There are some silvers to choose from (assuming they skip second map, so third one is map 2 here):
- Witch (
You must be registered to see the links) (map 1);
- Mage (
You must be registered to see the links) (map 2);
- Heavy Infantry (
You must be registered to see the links) (map 3)
- Samurai (
You must be registered to see the links) (map 7);
- Monk (
You must be registered to see the links) (map 8):
- Angel (
You must be registered to see the links) (map 10)
Continued in next post...